mercredi 21 décembre 2011

arduino unipolar motor stepper

Après avoir cru que mon moteur était mal branché il s'agissait plutôt de mon code!
J'utilisait la bibliothèque stepper, peut être un peu mal calibré. La le moteur tourne gentiment dans le sens des aiguilles d'une montre.

Commun : Noir
phase A : Rouge
phase B : blanc
Phase C : Marron
Phase D : vert

Note avec mon moteur descendre sous les 5 ms de delay n'est pas possible.

Code arduino

/* Stepper Copal
* -------------
*
* Program to drive a stepper motor coming from a 5'25 disk drive
* according to the documentation I found, this stepper: "[...] motor
* made by Copal Electronics, with 1.8 degrees per step and 96 ohms
* per winding, with center taps brought out to separate leads [...]"
* [http://www.cs.uiowa.edu/~jones/step/example.html]
*
* It is a unipolar stepper motor with 5 wires:
*
* - red: power connector, I have it at 5V and works fine
* - orange and black: coil 1
* - brown and yellow: coil 2
*
* (cleft) 2005 DojoDave for K3
* http://www.0j0.org | http://arduino.berlios.de
*
* @author: David Cuartielles
* @date: 20 Oct. 2005
*/

int motorPin1 = 8;
int motorPin2 = 9;
int motorPin3 = 10;
int motorPin4 = 11;
int delayTime = 500;

void setup() {
pinMode(motorPin1, OUTPUT);
pinMode(motorPin2, OUTPUT);
pinMode(motorPin3, OUTPUT);
pinMode(motorPin4, OUTPUT);
}

void loop() {
digitalWrite(motorPin1, HIGH);
digitalWrite(motorPin2, LOW);
digitalWrite(motorPin3, LOW);
digitalWrite(motorPin4, LOW);
delay(delayTime);
digitalWrite(motorPin1, LOW);
digitalWrite(motorPin2, HIGH);
digitalWrite(motorPin3, LOW);
digitalWrite(motorPin4, LOW);
delay(delayTime);
digitalWrite(motorPin1, LOW);
digitalWrite(motorPin2, LOW);
digitalWrite(motorPin3, HIGH);
digitalWrite(motorPin4, LOW);
delay(delayTime);
digitalWrite(motorPin1, LOW);
digitalWrite(motorPin2, LOW);
digitalWrite(motorPin3, LOW);
digitalWrite(motorPin4, HIGH);
delay(delayTime);
}

rooter android

Un peu galère à trouver ou à faire . Pas réussi avec les tutos cyanogenmod.com par adb mais androot est la.

shell sudo su make me root.......

installation du SDK android

installation du sdk android + eclipse

Installing the Android SDK
Download the latest version of the Android SDK
Unzip it and move it where needed
unzip Downloads/android-sdk_r14-mac_86.zip -d~/bin
Open Terminal.app (in /Applications/Utilities)
Edit ~/.profile and append
export PATH=~/bin/android-sdk_r14-mac_86/platform-tools:~/bin/android-sdk_r14-mac_86/tools:$PATH
Load new .profile
source .profile
Run Android SDK Manager
android
Install Components

Installing Eclipse
Download the latest version of Eclipse (Classic or Java Developers are probably best)
Open Terminal.app (in /Applications/Utilities)
Unzip it and move it where needed.
tar -zxvf Downloads/eclipse-java-helios-SR1-macosx-cocoa-x86_64.tar.gz
Optional: Add to PATH. Edit ~/.profile and append export PATH=[eclipse folder]:$PATH then reload source .profile.
Open Eclipse.
Go to Help » Install New Software.
Click Add.
Name: Google ADT
Location: https://dl-ssl.google.com/android/eclipse/
Install pieces that you want.
When ADT installation is complete, the latest version of eclipse and ADT will ask you to install or set location for android SDK. Set the location where you installed the SDK. Click OK.
If you did not see a prompt to install or choose location for ADT, open Preferences, go to Android. Set your SDK location. Click OK.


sources:
http://wiki.cyanogenmod.com/wiki/Howto:_Install_the_Android_SDK

mardi 20 décembre 2011

arduino to stepper

-----
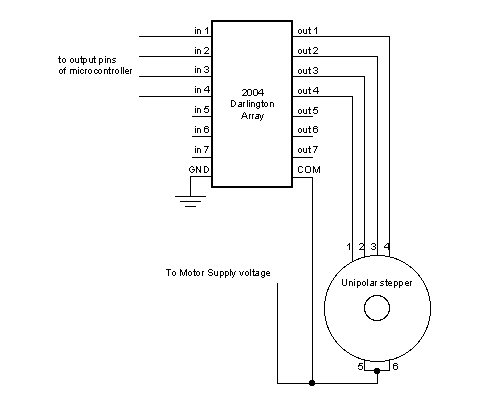
Montage Arduino à base de driver à base de ULN2003A.

Une page de référence.

le montage unipolaire

Les composants U2004 darlington


Le montage bipolaire


Schéma


Les composant 75441one

Un autre piste à l'aide d'un L293D.


Nous allons réaliser un montage à base de ULN2004


ULN2004

Ca a l'air de marcher mais j'ai l'impression de ne pas avoir bien les bonnes phase du moteur!!!


cube craft


Pour se détendre pourquoi pas faire des petits cubes.


lundi 19 décembre 2011

Ardubloc ide for arduibo

1.Download ardublock-all.jar ArduBlock

2. In Arduino IDE, open menu “Arduino” -> “Preferences”

3. Find “Sketchbook location:”

  • In Mac, it’s by default “Documents/Arduino” under user’s home directory
  • In Linux, it’s by default “sketchbook” under user’s home director
4. Copy ardublock-all.jar to tools/ArduBlockTool/tool/ardublock-all.jar under “Sketchbook location”,Assume the user is “abu,”In Windows, it’s by default “Documents\Arduino” under user’s home directory

  • In Mac, /Users/abu/Documents/Arduino/tools/ArduBlockTool/tool/ardublock-all.jar
  • In Linux, /home/abu/sketchbook/tools/ArduBlockTool/tool/ardublock-all.jar
  • In Windows, C:\Users\abu\Documents\Arduino
5. Start the Arduino IDE and find ArduBlock under the Tool menu

Example of a ArduBlock Program

Programs

The drawers of ArduBlock are divided into 6 different categories.

Control

Control blocks are for program flow control

Controls

Numbers, Constants and Variables

These blocks provide access to computational data

Controls

Operators

These blocks provides operators for logical and mathematical computation

Operators

Utilities

These blocks provide access to utilities functions provided by Arduino platform

Utilities

Bricks

These blocks provide more intuitive access to electronic bricks system.

Bricks

Pin

This drawer probably needs a better name. The blocks here provide I/O access to Arduino Pins

Pins


Handling Digital Input and Output

The block below basically represent the “Hello World” of Arduino Programming mapping to the code fragments

   if (digitalRead(1) == HIGH) {     digitalWrite(2, HIGH);   } 

Untitled

Multiple events on the same pin should be support by defining multiple events on the same pin. It seems that a good visual grouping of the same pin would be a good thing and improve readability of the program.

Untitled

The OpenBlocks come with a pretty cool annotation system to add comments to block. This could be leveraged to enhance the readability of the program.

Untitled

Handling Analog Input and Output

The analog I/O handling should work the same way as the digital one.

Untitled

Doing conditional statements with Pin. The Pin 3 is identified with color in the ‘if’ statement. Maybe a label on it will work better.

Untitled

Functional Programming or Object Oriented?

Since Clojure is used as programming language to drive the ArduBlock, it seems that it pushes my design of the block language to have more functional programming favor. It may be a good thing to make program more straight forward to understand and to program. But really need to guard against the tunnel vision.

Rule Engine?

Since I am using a rule engine in a project right now, I may also be influenced by that. I see all these blocks laying out conditions to trigger actions. It may be worth a while to see if a small Reta Algorithm can be easily implemented in Arduino to handle the rules layout by the blocks. This seems to be a nature way to design a run time for this language.


Design I

The first design is of course to follow the Arduino Language Reference closely. However, the resulting block language seems to be a bit too “verbose?” Or should I say “busy” since it’s really a graphical representation of the textual program. Here is a sample of what it looks like for the equivalence of codes here.

void setup() {   pinMode(1, INPUT);   pinMode(2, OUTPUT); } void loop() {   if (digitalRead(1) == HIGH) {     digitalWrite(2, LOW);   } } 

Vpl 1

Design II

Since the block language is targeted at the beginner of Arduino and programming, most of time, we talk about “When the button on pin 1 is pushed, I want the LED on pin 2 to light up.” There is a much natural way to map this statement into an intuitive block language by building the blocks around the pin. Here is how it may look like:

Vpl 2

This language is more concise and easier to understand. The language itself should provide enough meta info to infer the setup codes. However, in order to do this, the language may need a little runtime (OS?) to be compiled along with the Sketch but it seems to be worth the effort.

The OpenBlocks codes I am playing around with the idea is available at my openblocks on github. Appreciate any feedback on this.


source:

http://blog.ardublock.com/


vendredi 16 décembre 2011

jitty android web server

des exemples d'app pour jitty.

A tester donc
...


1- Etape installation de i-jetty.
installer un fichier apk.
a l'aide apkInstaller par exemple ou android market.
-----


http://code.google.com/p/i-jetty/
---

--


2-/Repertoire pour les fichiers


3-/ Deployer une application pour ijetty
mettre un fichier .war dans le répertoire webapp
Penser à tuer la tache ijetty lors du téléversement pour éviter d'avoir des problèmes du genre partage de média.
Au pire si jetty bug supprimer le répertoire jetty de la carte mémoire, ou bien supprimer le fichier .war qui est peut être buger.


4-/ Créer un fichier .war
apparement il faut utiliser eclipse.


Source

http://www.enavigo.com/2008/08/29/deploying-a-web-application-to-jetty/